Getting Started on RaspberryPi
The Getting Started guide shows you how to connect your IR module to your RaspberryPi and how to record or transmit IR signal.
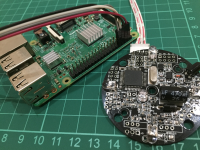
How to wire
Wire up your development board as shown in the diagram below.

Configiring your Pi to use UART
RaspberryPi GPIO serial port is disabled by default. In order to enable it, edit config.txt:
$ sudo nano /boot/config.txtenable_uart=1Disabling the Console
$ systemctl stop [email protected]
$ systemctl disable [email protected]
Setup /boot/cmdline.txt
$ nano /boot/cmdline.txt dwc_otg.lpm_enable=0 console=serial0,115200 console=tty1 root=/dev/mmcblk0p2 rootfstype=ext4 elevator=deadline fsck.repair=yes root waitconsole=serial0,115200Reboot your Pi to complete
Sending and Receiving IR using RaspberryPi
IR Controller supports the standard UART interface, TTL level. It operates at 9600 baud, 8 data bits, no parity, and 1 stop bit (8N1).
Step 1
Here's code to start learning mode (Using Python IDE):
Full code on GitHib
import serial

# configure the serial connection
ser = serial.Serial(
    port='/dev/ttyS0',
    baudrate=9600,
    parity=serial.PARITY_NONE,
    stopbits=serial.STOPBITS_ONE,
    bytesize=serial.EIGHTBITS,
    timeout=1
)

ser.isOpen()

startLearningModeCmd = bytearray([224])
ser.write(startLearningModeCmd)

# read the start leaning mode response.
data = ser.readline().rstrip()

# wait for the ir signal
while 1:
    data = ser.readline().rstrip()

    if not data:
        continue

    ba = bytearray(data)
    ir = ",".join(str(bit) for bit in ba)
    print ir
The above code sends E0(224) to the IR controller. When the device is ready to learn a new IR code, the built-in indicator will turn blue. Now hold your remote close to the IR receiver LED and press the button you wish to record.
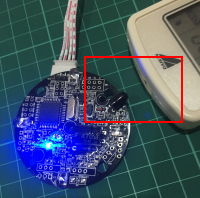
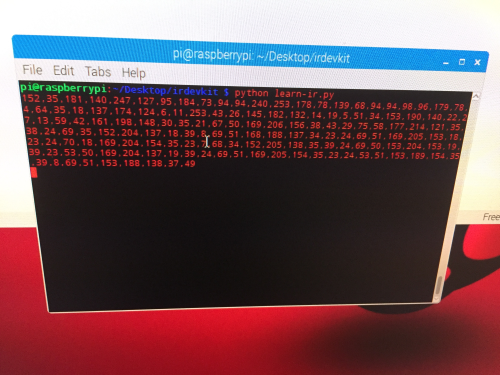
And IR controller will decode the IR signal and print it on the console
Step 2
Here's code on how to send the IR code that just learnt (Using Python IDE):
import serial

# configure the serial connection
ser = serial.Serial(
    port='/dev/ttyS0',
    baudrate=9600,
    parity=serial.PARITY_NONE,
    stopbits=serial.STOPBITS_ONE,
    bytesize=serial.EIGHTBITS,
    timeout=1
)

ser.isOpen()

# format:
# [227, your ir goes here]

irSignal = bytearray([227, 152,35,181,140,247,128,95,185,73,94,94,240,253,178,78,139,68,93,94,98,96,179,78,4,64,35,18,137,174,124,6,11,253,43,26,145,182,132,14,19,5,51,34,153,190,140,22,27,13,59,42,161,198,148,30,35,21,67,50,169,206,156,38,43,29,75,58,177,214,121,35,38,24,69,35,152,204,137,18,39,8,69,51,168,188,137,34,23,24,69,51,169,205,153,18,23,24,70,18,169,204,154,35,23,7,68,34,152,205,138,35,39,24,69,50,153,204,153,18,39,23,53,50,169,204,137,19,39,24,69,51,169,205,154,35,23,24,53,51,153,189,154,35,39,8,69,50,153,188,138,37,48])
ser.write(irSignal)

# read the response.
data = ser.readline().rstrip()
Here is the complete code on GitHib
Now you are ready to transmit a IR code via IR controller.
Congratulations! Now you know how to learn and send IR codes with RaspberryPi using IR DevKit