Getting Started on Arduino / ESP8266 / ESP32
The Getting Started guide shows you how to connect your IR module to your ESP8266 / ESP32 or Arduino development board and how to record or transmit IR.
How to wire
Wire up your development board as shown in the diagram below.
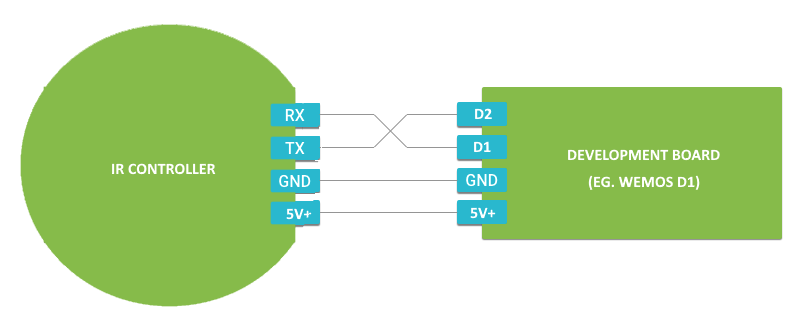
Before we start, make sure you have selected "WeMos D1" board from Tools -> Board in your Arduino IDE. D1, D2 are examples for Wemos D1 GPIO pins. You can change it according to your development board otherwise you see an error like error "D1 is not declared in this scope"
Learning IR
Learning a new IR signal is a two step process.
Step 1: Send the start learning mode command
Step 2: Read the IR signal from IR Controller
IR Controller supports the standard UART interface, TTL level. It operates at 9600 baud, 8 data bits, no parity, and 1 stop bit (8N1).
Step 1
Here's code to start learning mode (Using Arduino IDE):
   #include <Arduino.h>
   #include <SoftwareSerial.h>

   SoftwareSerial mySerial(D1, D2); // RX, TX

   void setup() {
        // put your setup code here, to run once:
        Serial.begin(9600);

        mySerial.begin(9600); // Start communicating with IR controller

        // Start learning mode
        uint8_t data[] = {0xe0};
        mySerial.write((uint8_t*)data, sizeof(data));
    }
    void loop() {
        ...
    }
Step 2
Here's code to read the response (Using Arduino IDE):
   #include <Arduino.h>
   #include <SoftwareSerial.h>

   SoftwareSerial mySerial(D1, D2); // RX, TX

   void setup() {
        // put your setup code here, to run once:
        Serial.begin(9600);
       ....
    }

    void loop() {
        if (mySerial.available()) {
            // Read the data from buffer
            int len = 0;
            int c;
            unsigned long timeout = 700;
            unsigned long start = millis();

            int buffer[512];
            memset(buffer, 0, sizeof(buffer));

            while ((millis() - start < timeout)) {
                if (mySerial.available()) {
                c = mySerial.read();
                buffer[len++] = c;
                Serial.print(c);
                Serial.println(",");
                }
                yield();
            }
        }
    }
Here is the complete code on GitHib
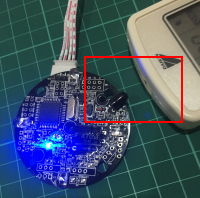
The above code sends E0(224) to the IR controller. When the device is ready to learn a new IR code, the built-in indicator will turn blue. Now hold your remote close to the IR receiver LED and press the button you wish to record.In the response first byte is the packet size then Infrared code followed by checksum
Now you are ready to transmit a IR code via IR controller.
Transmit IR
Here is the complete code GitHib
#include  <Arduino.h>
#include  <SoftwareSerial.h>

SoftwareSerial mySerial(D1, D2); // RX, TX

bool sent = false;

void setup() {
  // put your setup code here, to run once:
  Serial.begin(9600);

  mySerial.begin(9600); // Connect to IR controller

  // Paste the IR code here. Make sure to remove the length and checksum if you did not use receive_ir.ino to copy the ircode. For more info refer
  // https://irdevkit.com/docs/ircontroller-spec.html
  char* irCode = "152,35, .....";

  uint8_t irArray[512];
  unsigned int idx = 1;
  char *str;

  irArray[0] = 227; // Sending IR command

  while ((str = strtok_r(irCode, ",", &irCode)) != NULL) {
    uint8_t ir = (uint8_t)atoi(str + '\0');
    irArray[idx++] = ir;
    yield();
  }

  mySerial.write((uint8_t*)irArray, idx);
}
Congratulations! Now you know how to learn and send IR codes with IRDevKit