Getting Started on Maker
This getting started guide shows how to program your Maker module using Arduino IDE and how to record or transmit IR.
This is Maker module
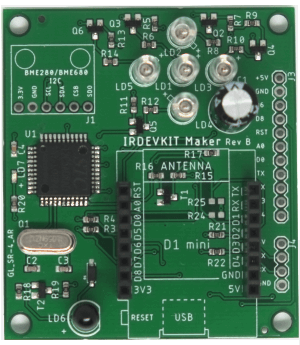
Here is the GPIO map.
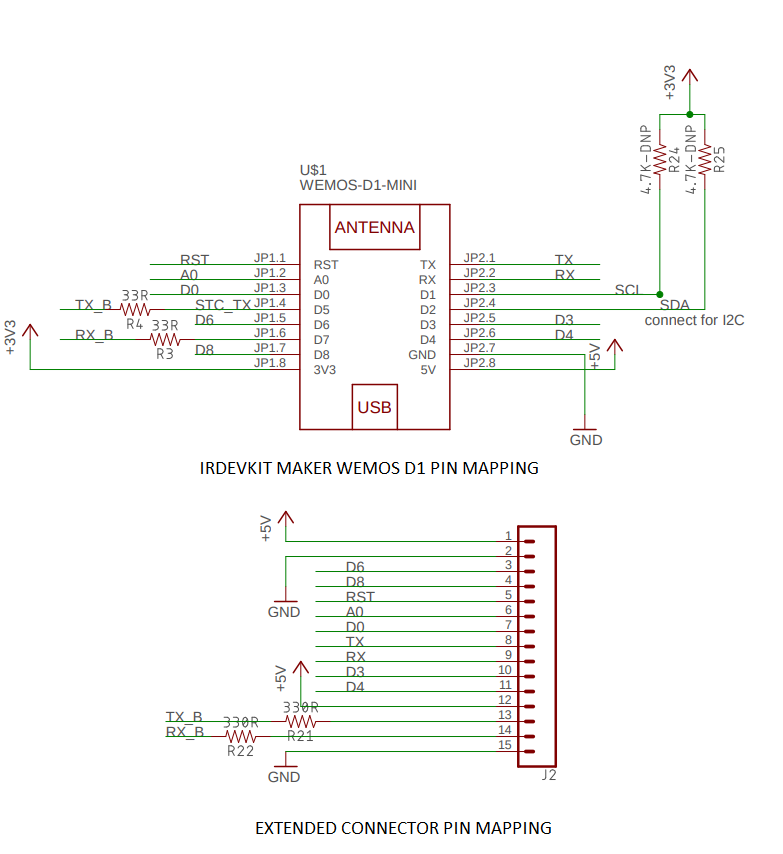
Please note that following PINs are already in use.
| GPIO | Description |
|---|---|
| D5 | IR Controller (Rx) |
| D7 | IR Controller (Tx) |
RaspberryPi or any other Microcontroller support.
You can connect a RaspberryPi or any other micro-controller via UART interface.

Select a development IDE
First step is to setup the development IDE. IRDEVKIT supports two most popular platforms which are Arduino and PlatformIO.Using Arduino IDE
Be sure to download the version for your operating systemUsing Arduino IDE
1. Open Arduino and click on "File -> Preferences".
2. In "Aditional Boards Manager URLs" add this line and click on "OK":
"http://arduino.esp8266.com/stable/package_esp8266com_index.json"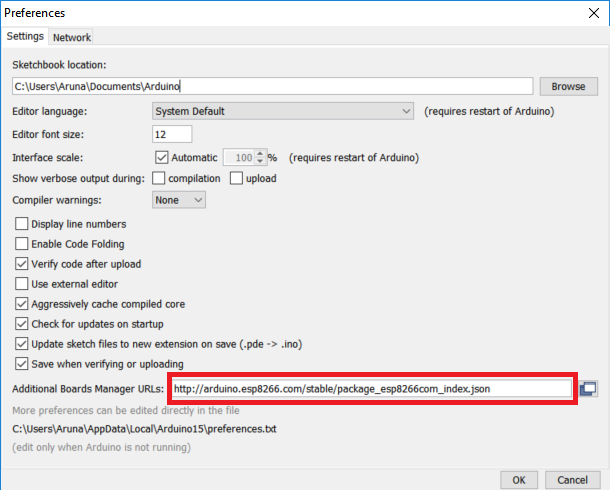
3. Go to Tools -> Board -> Boards Manager, type ESP8266 and install it.
4. Restart the Arduino IDE.
5. Go again to Tools -> Board and select Wemos D1 R1.
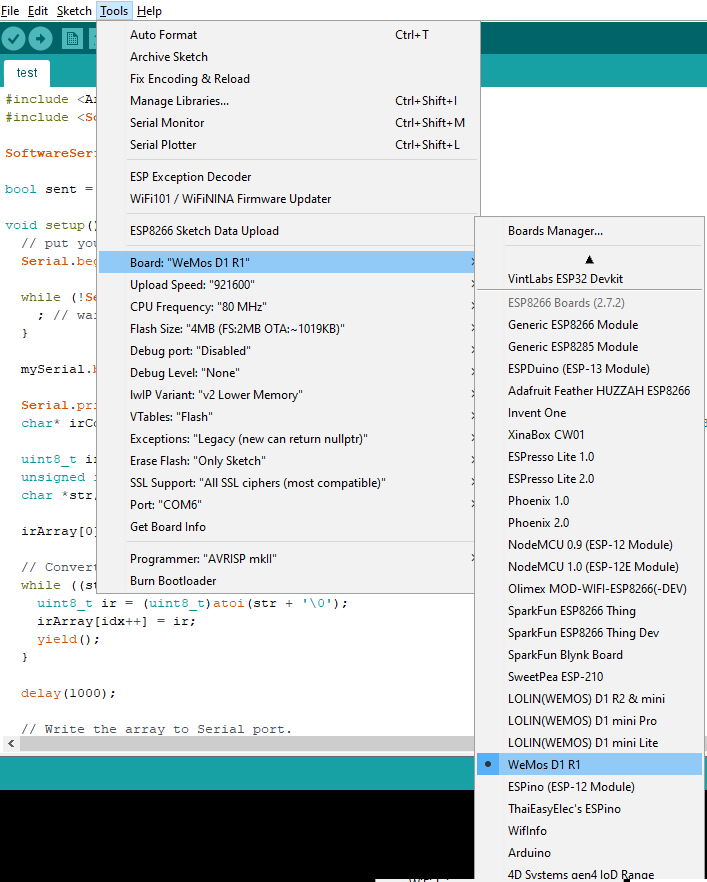
6. This module is based on Wemos D1 mini R1 (ESP8266) . Before go to next step, make sure you have selected Wemos D1 mini R1 board from Tools -> Board in your Arduino IDE.
Using PlatformIO
1. Download and install from here. We recommend using Visual Studio Code IDE
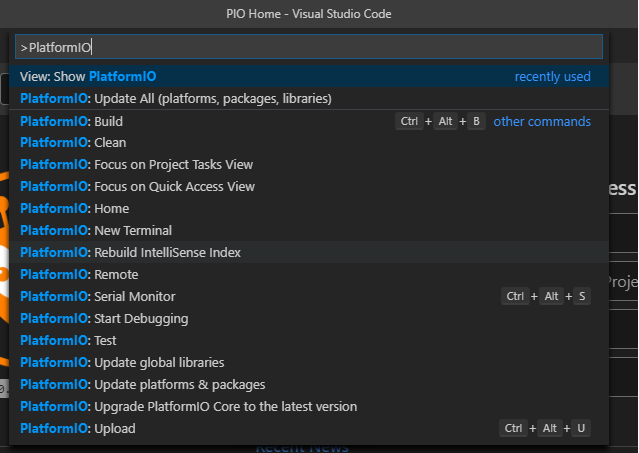
2. Open Visual Studio Code IDE. Goto View -> Command Palette. Search for PlatformIO. Select View: Show PlatformIO
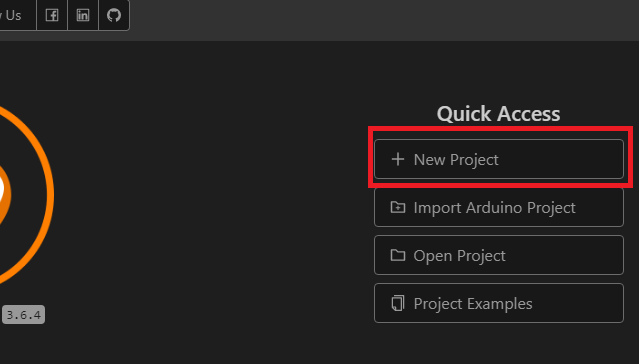
3. Click new project
4. Select ThaiEasyElec's ESPino
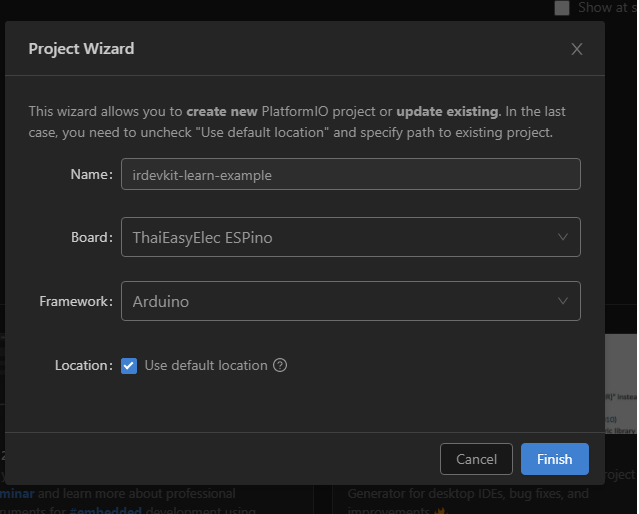
5. Once you click on finish it will take few seconds to create a basic Arduino project
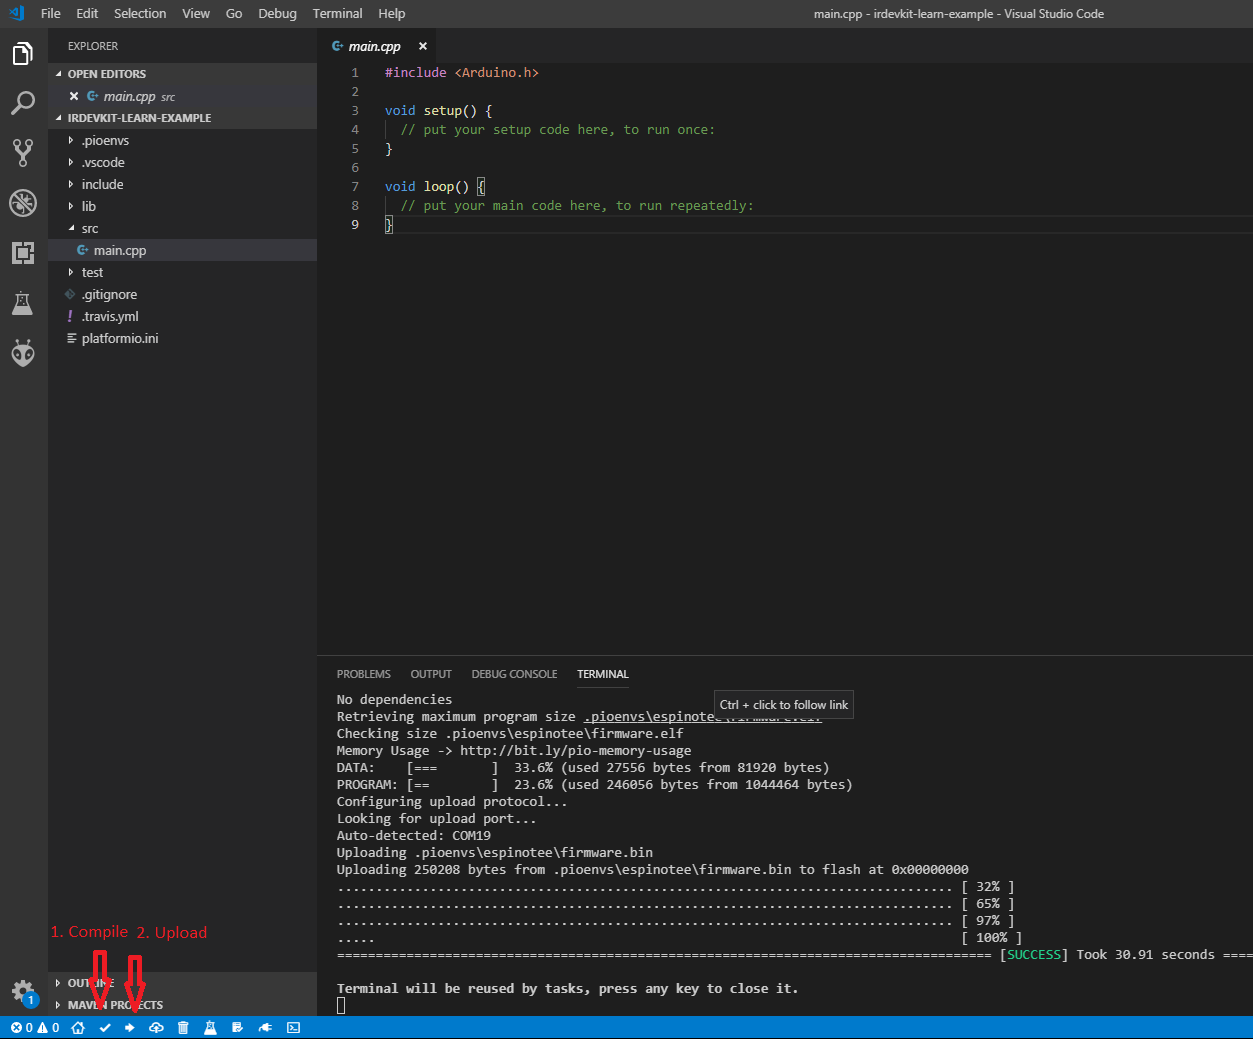
6. Complie the project to make sure IDE is setup properly
.
Learning IR
Learning a new IR signal is a two step process.
Step 1: Send the start learning mode command to the IR Controller
Step 2: Read the IR signal from IR Controller
IR Controller supports the standard UART interface, TTL level. It operates at 9600 baud, 8 data bits, no parity, and 1 stop bit (8N1).
Complete code
Here's code to start learning mode and decode IR
#include <Arduino.h>
#include <SoftwareSerial.h>

SoftwareSerial mySerial(D5, D7); // RX, TX

void start_learning_mode();
void read_ir_signal();

void setup() {
  // put your setup code here, to run once:
  Serial.begin(9600);

  while (!Serial) {
    ; // wait for serial port to connect. Needed for native USB port only
  }

  mySerial.begin(9600); // Start communicating with IR controller

  start_learning_mode();
}

void loop() {
  if (mySerial.available()) {
      // Read the data from buffer
      read_ir_signal();
  }
}

void start_learning_mode() {
  Serial.println("Turnning on learning mode ..");

  // Start learning mode by sending 224 (0xe0 in hex) to the ir controller
  uint8_t data[] = {0xe0};
  mySerial.write((uint8_t*)data, sizeof(data));

  // Read the device response
  int len = 0;
  int r;
  unsigned long timeout = 700;
  unsigned long start = millis();
  int buffer[1];
  memset(buffer, 0, sizeof(buffer));

  while (millis() - start < timeout) {
    if (mySerial.available()) {
      buffer[0] = mySerial.read();
    }

    yield();
  }

  if(buffer[0] == 255) { // ff
    Serial.println("Error starting..");
  }
  else {
    Serial.println("Ready to record the remote. Press any button now..");
  }
}

void read_ir_signal() {
  int len = 0;
  int c;
  unsigned long timeout = 700;
  unsigned long start = millis();

  int buffer[512];
  memset(buffer, 0, sizeof(buffer));

  while ((millis() - start < timeout)) {
    if (mySerial.available()) {
      c = mySerial.read();
      buffer[len++] = c;
      //Serial.print(c);
      //Serial.println(",");
    }
    yield();
  }

 String ir_signal = "";
 unsigned int num = 0;

 for (int idx = 0; idx < len; idx++) {
     ir_signal += buffer[idx];

     // If not the last index, append "," to string
     if(idx+1 != len ) {
       ir_signal += ",";
     }

     // Ignore the last digit in the array. It is the checksum
     if(idx != len -1) {
         num += buffer[idx];
     }
 }

 byte received_checksum = (byte)num;
 int ir_signal_checksum = buffer[len -1];

 if(received_checksum == ir_signal_checksum) {
    Serial.println("Your ir signal:");
    Serial.println(ir_signal);
 } else {
    Serial.println("Invalid checksum:");
 }
}
Here is the complete code on GitHib
The above code sends E0(224) to the IR controller. When the device is ready to learn a new IR code, the built-in indicator will turn blue. Now hold your remote close to the IR receiver LED and press the button you wish to record. In the response data, first byte is the packet size then infrared data followed by checksum
Now you are ready to transmit a IR code via IR controller.
Transmit IR
Here is the complete code GitHib
#include  <Arduino.h>
#include  <SoftwareSerial.h>

SoftwareSerial mySerial(D5, D7); // RX, TX


void setup() {
  // put your setup code here, to run once:
  Serial.begin(9600);

  mySerial.begin(9600); // Connect to IR controller

  // Paste the IR code here.
  char* irCode = "152,35, .....";

  uint8_t irArray[512];
  unsigned int idx = 1;
  char *str;

  irArray[0] = 227; // Sending IR command

  while ((str = strtok_r(irCode, ",", &irCode)) != NULL) {
    uint8_t ir = (uint8_t)atoi(str + '\0');
    irArray[idx++] = ir;
    yield();
  }

  mySerial.write((uint8_t*)irArray, idx);
}
Congratulations! Now you know how to learn and send IR codes with IRDevKit